Node におけるスケールアーキテクチャ考察(Scale 編)というエントリーを読んで、RedisはPub/Sub型通信をサポートしているという事を知りました。エントリーでも言及されているように、Pub/Subを使えば Node.js + WebSocket サーバをスケールする際に、中継サーバの役割を果たす事が出来るはずです。
そんな訳で実際に Node.js と Redis を使って Pub/Sub の実験を行なってみました。ユーザが別々のNode.jsサーバに接続していてもWebSocketを通してメッセージのやり取りを出来るようにします。
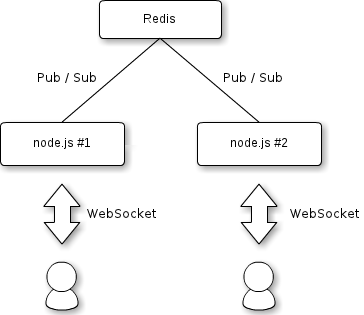
イメージとしてはこんな感じです。
下準備
Ubuntuの場合は apt-get で1発でインストールする事が出来ます。
$ sudo apt-get install redis
npmでredisモジュールをインストールします。
$ npm install redis
Node.js から Redis の Pub/Sub を使ってみる
試しにPub/Subとはどんなものか試してみましょう。Node.jsのコンソールを起動します。
$ node
コンソールに下記コードを入力します。
var sys        = require('sys');
var redis      = require('redis');
var subscriber = redis.createClient(6379, 'localhost');

subscriber.subscribe('hoge channel');
subscriber.on("message", function(channel, message) {
    sys.puts(channel + " :" + message);
});
別のターミナルで、下記コマンドを実行します。
$ redis-cli publish "hoge channel" "Hello World!"
Node.js のコンソール画面に 「Hello World!」と表示されるはずです。これがPub/SubのSubにあたります。
では、今度はNode.js側からメッセージを送ってみましょう。先ほどのredis-cliを実行したターミナルで下記コマンドを実行します。
$ redis-cli subscribe "hoge channel"
Reading messages... (press Ctrl-c to quit)
1. "subscribe"
2. "hoge channel"
3. (integer) 1
Node.jsのコンソールに下記コードを入力します。
publisher = redis.createClient(6379, 'localhost');
publisher.publish("hoge channel", "FooBar");
Node.js のコンソール画面と redis-cli を実行した画面両方に「FooBar」と表示されますね。これで Redis の Pub/Sub の動きは何となく掴めたかと思います。
WebSocket を使ったチャットもどきを実装する
// This program is free software. It comes without any warranty, to
// the extent permitted by applicable law. You can redistribute it
// and/or modify it under the terms of the Do What The Fuck You Want
// To Public License, Version 2, as published by Sam Hocevar. See
// http://sam.zoy.org/wtfpl/COPYING for more details.

var sys        = require('sys')
  , opts       = require('opts')
  , ws         = require('websocket-server')
  , redis      = require('redis')
  , server     = ws.createServer()
  , subscriber = redis.createClient(6379, 'localhost')
  , publisher  = redis.createClient(6379, 'localhost');

opts.parse([
    {
        'short':       'p',
        'long':        'port',
        'description': 'WebSocket Port',
        'value':       true,
        'required':    true
    }
]);

subscriber.on("error", function(err) {
    sys.debug(err);
});

publisher.on("error", function(err) {
    sys.debug(err);
});

subscriber.subscribe("chat");
subscriber.on("message", function(channel, message) {
    sys.puts(message);
    server.broadcast(message);
});

server.addListener("connection", function(connection) {
    sys.puts("client connected: " + connection.id);

    connection.addListener("message", function(message) {
        publisher.publish("chat", message);
    });
});

server.addListener("close", function(connection) {
    sys.puts("client disconnected: " + connection.id);
});

server.listen(opts.get('port'));
上記コードをapp.jsとして保存し、複数のポートで立ち上げます(別途 npm で websocket-server と opts をインストールする必要があります)。
$ node app.js -p 8001
$ node app.js -p 8002
$ node app.js -p 8003
$ node app.js -p 8004
Google Chrome の JavaScript コンソールを複数のタブで開き、下記のように入力します。
var connection = new WebSocket("ws://localhost:8001");
connection.onmessage = function(event) { console.log(event.data) }
connection.send("Hello!!");
複数のタブで connection.send(……) をたくさん入力してみると分かりやすいと思います。どのタブで入力してもメッセージが表示されるはずです。
まとめ
今回は Redis の Pub/Sub を試す目的でしたので、チャットプログラム自体はメッセージを broadcast する事しか出来ません。しかし、Redis を通してやり取りするデータ形式をJSONにしておけば、色々な情報を各々の node.js サーバで共有する事ができるので、実用性が上がるのではないでしょうか。
また、Redis自体もレプリケーションが可能なので中継サーバもスケールする事が出来ると思います(未検証)。